How to self-host Llama-Guard 3 for content moderation
Llama-guard is a one of the best available models for content moderation at the moment. Here's a guide on everything from setting up a server to configuring Llama for your use case.

This guide is written for handling content moderation with Llama Guard, but you can also use it for hosting any Llama model for other use cases.
If you don't have the resources or time to host your own model, you can easily try out Llama-Guard on the Moderation API. The Moderation API also enables you to add your own guidelines to Llama-Guard, customising it for your specific use case.
Table of contents
- Overview of Llama models
- Choosing a GPU Server
- Installing Drivers and Dependencies
- Get access to Llama models on hugging face
- Using vLLM to Serve Your Model
- Using Docker for Simplified Deployment
- Using Your Llama-Guard API Client Side
- Customising Llama-Guard with your own safety guidelines
- Conclusion
Prerequisites
- Knowledge about using Ubuntu and the terminal through SSH
- Knowledge about Docker
- Free Hugging-face account
Overview of Llama models
Llama models are continuously updated by Meta labs. Llama 3.1 is the 4th and latest iteration which came out in July 2024. The first Llama model came out in February 2023, so Meta is moving fast.
Besides the model versions, Llama is also available in different sizes ranging from 7 Billion parameters all the way to a massive 405B model.
| Name | Release date | Parameters | Training cost (petaFLOP-day) | Context length | Corpus size | Commercial viability? |
|---|---|---|---|---|---|---|
| LLaMA | February 24, 2023 | 6.7B, 13B, 32.5B, 65.2B | 6,300[31] | 2048 | 1–1.4T | No |
| Llama 2 | July 18, 2023 | 6.7B, 13B, 69B | 21,000[32] | 4096 | 2T | Yes |
| Code Llama | August 24, 2023 | 6.7B, 13B, 33.7B, 69B | ||||
| Llama 3 | April 18, 2024 | 8B, 70.6B | 100,000[33][34] | 8192 | 15T | |
| Llama 3.1 | July 23, 2024 | 8B, 70.6B, 405B | 440,000[35][36] | 128,000 |
Large models with more parameters are more capable and intelligent than smaller models, but require expensive machines with multiple GPUs to run.
Often you can fine-tune smaller models to solve your use case better and faster than a larger model would.
One of these fine-tuned models is Llama-guard-3-8B which is fine tuned from Llama-3.1 and trained specifically for content moderation. That is the model I'm using in this example.
Fine tuning your own model is doable but out of the scope of this post. In short I would recommend to fine-tune it using something like Google Colab or AWS Sagemaker on large GPU machines. Then you can host and server the resulting model files on smaller GPU machines.
Choosing a suitable GPU server for your LLama model
First you'll need to choose an adequate server for serving your model. LLM models require a lot of resources to run, so these servers are not cheap.
Llama-3.1 models with 8B parameters need at least 20bg, but I've included some smaller and larger instances here for comparison:
| Provider | Instance Type | GPU Type | VRAM | Compute Capability | vCPUs | RAM | Hourly Cost | Monthly Cost* | Notes |
|---|---|---|---|---|---|---|---|---|---|
| AWS | g5.xlarge | NVIDIA A10G | 24 GB | 8.6 | 4 | 16 GB | $1.19 | $869 | Cheapest option with 24 GB VRAM, good for inference and graphics workloads |
| AWS | g4dn.xlarge | NVIDIA T4 | 16 GB | 7.5 | 4 | 16 GB | $0.526 | $384 | T4 is cost-effective for smaller models or workloads requiring less VRAM |
| Google Cloud | A2 High-GPU (a2-highgpu-1g) | NVIDIA A100 | 40 GB | 8.0 | 12 | 85 GB | $2.82 | $2,014 | High compute power with A100 GPU, suitable for training larger models |
| Google Cloud | N1-standard-4 + T4 | NVIDIA T4 | 16 GB | 7.5 | 4 | 15 GB | $0.476 | $347 | Google's T4 option, similar to AWS g4dn.xlarge but slightly cheaper |
| AWS | p3.2xlarge | NVIDIA V100 | 16 GB | 7.0 | 8 | 61 GB | $3.06 | $2,203 | Powerful but more costly, useful for heavy computation tasks that need V100 capabilities |
* Monthly cost assumes 730 hours of usage (24/7 operation).
- g4dn.xlarge and N1-standard-4 + T4 are both affordable T4-based instances, great for lightweight AI inference and smaller model training. But unfortunately they are too small to run a model with 8 Billion parameters such as Llama Guard.
- Our best option is the g5.xlarge which offers a bit more power and VRAM with the A10G GPU, still at a reasonable cost.
- Google Cloud’s A2 High-GPU remains a higher-end option, but it's included for those who need the additional VRAM and compute power at a mid-tier price point.
Install the required drivers and dependencies
Ensuring that you have the correct drivers and dependencies is the hardest part about this setup. You'll need to install the right GPU drivers and Cuda toolkit from Nvidia, and the steps for this depends on your GPU model.
Some hosting providers provide pre-made images to make this easier. AWS offers a deep learning GPI AMI that comes preinstalled with the necessary Nvidia drivers and dependencies for their machines. You can choose this when provisioning the server.
If you're unable to use a preconfigured image, you can use the steps here to install the necessary driver and dependencies.
There are 2 components needed for hosting Llama models:
- NVIDIA driver
- CUDA toolkit
The NVIDIA driver is required, whereas the toolkit can be installed using Docker as you'll see later in this guide. If you don't want to use Docker you'll also need to install the toolkit.
Nvidia also offers a detailed guide on setting up their GPUs here, but here are the basic steps:
Start by SSH'ing into your machine and then we can start executing the commands:
1.1 Upgrade Ubuntu
sudo apt update
sudo apt upgrade
1.2 NVIDIA Drivers Installation
First install a helper library to determine your GPU
sudo apt install ubuntu-drivers-commonThen list of all compatible drivers and find the recommended one.
sudo ubuntu-drivers devices
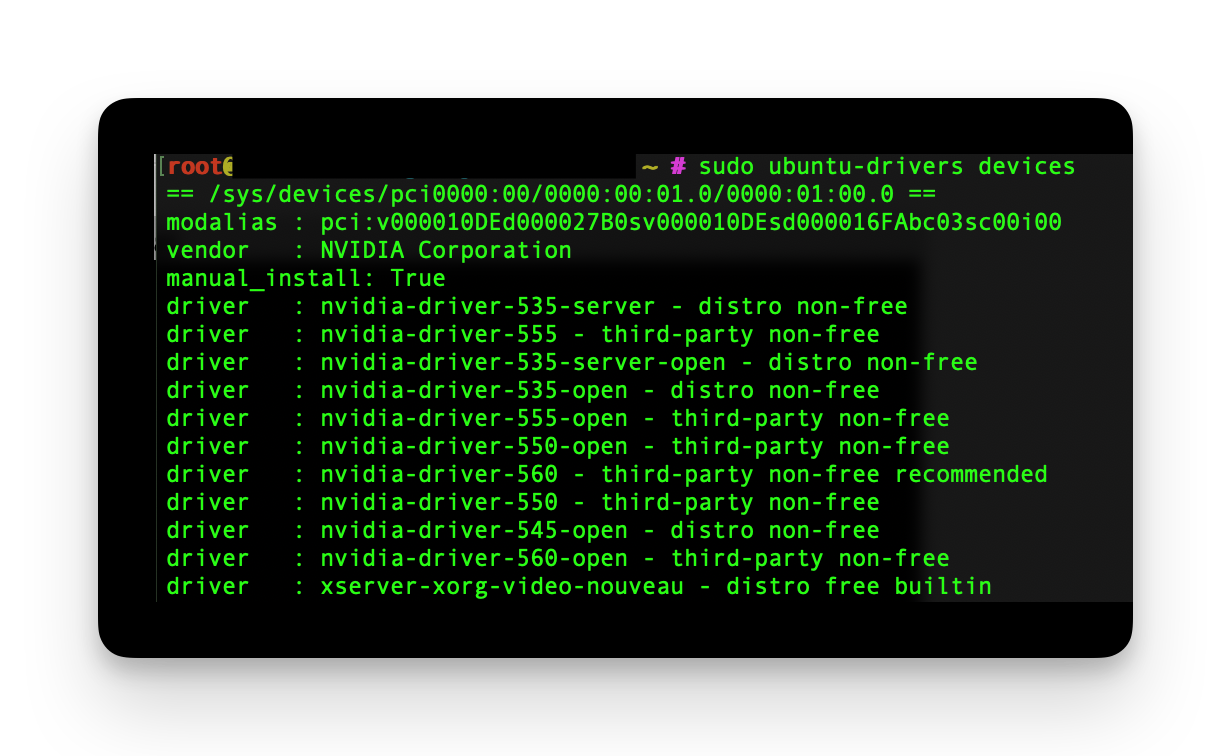
Then we'll install the recommended driver, in our case nvidia-driver-560:
sudo apt install nvidia-driver-560Reboot to load the driver:
sudo reboot nowNow we can confirm that the driver is installed and see CUDA version:
nvidia-smi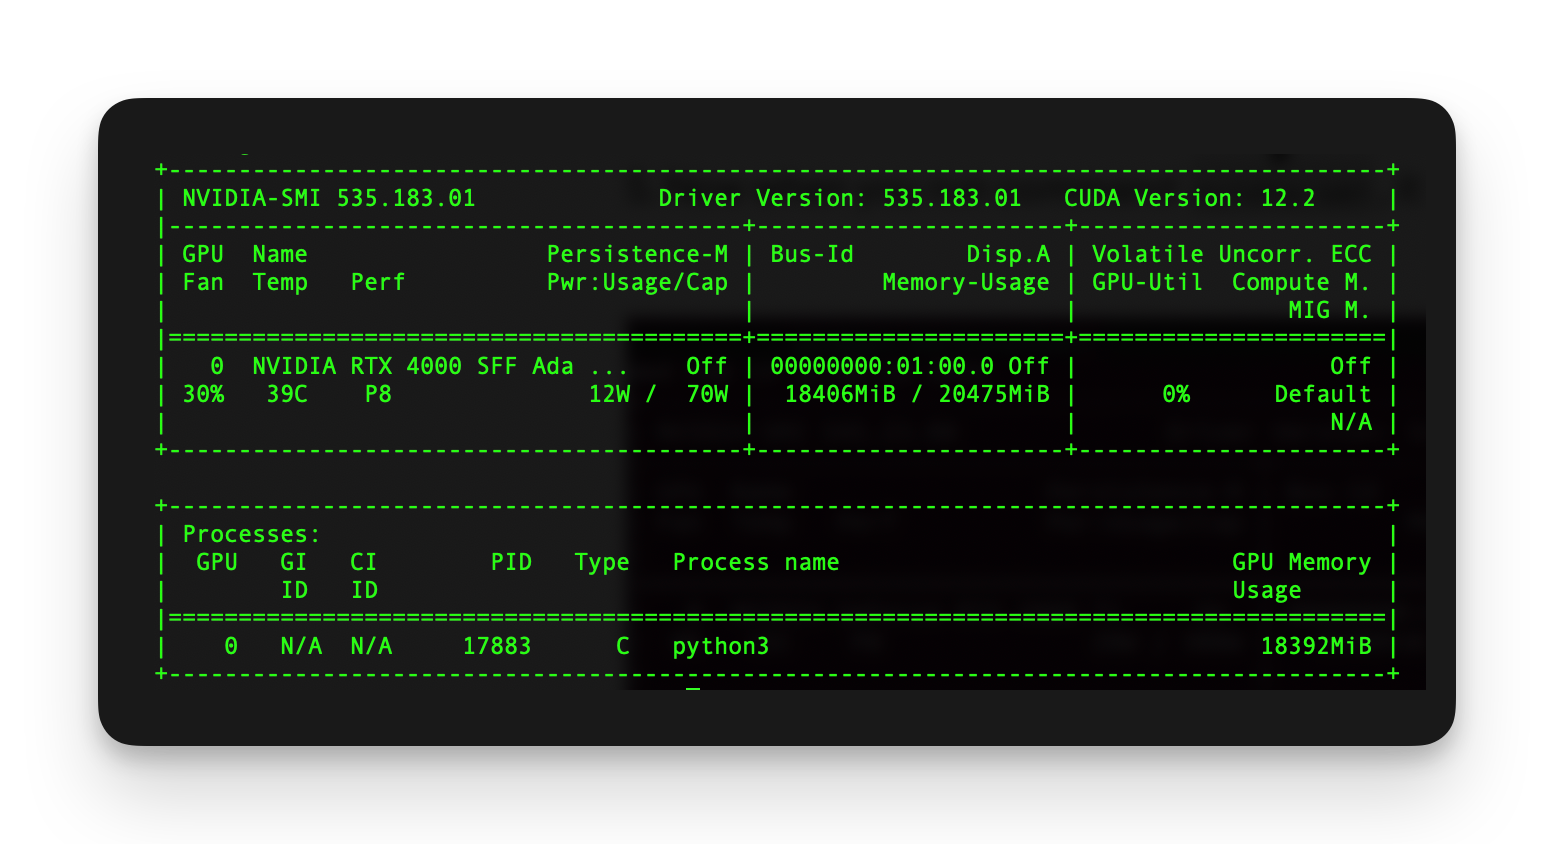
1.3 - CUDA Toolkit installation
If you plan to use the Docker image as we show later, you won't need the toolkit as the vLLM Docker image includes it. You can still install the toolkit if you wish, or if you plan to experiment with other solutions.
Start by installing GCC to build the toolkit:
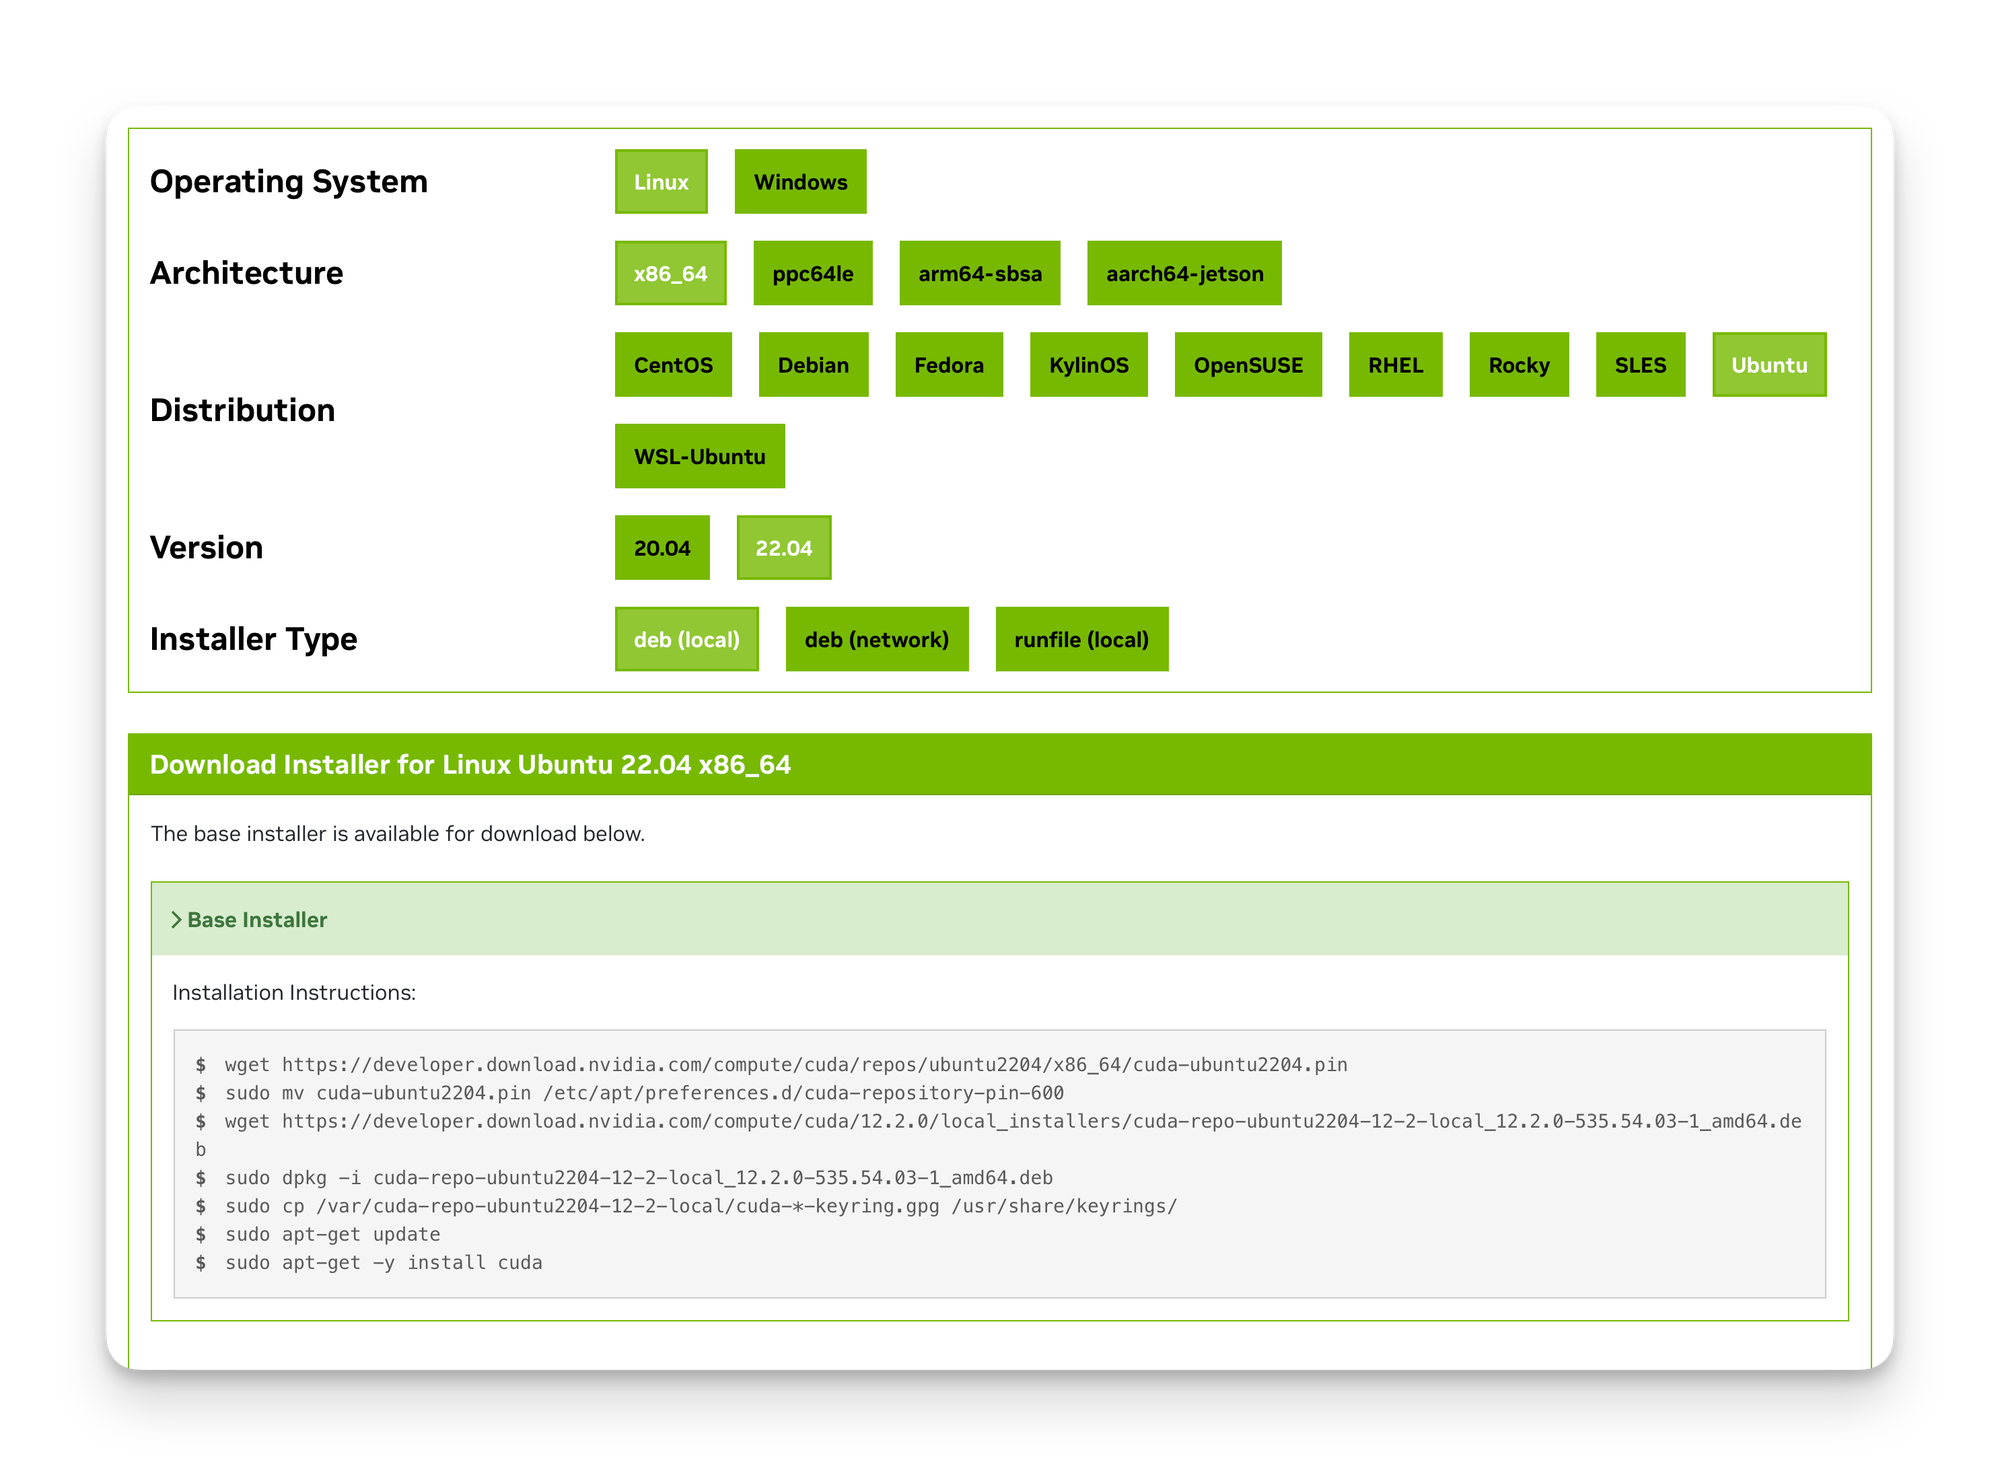
sudo apt install gccNext you'll need to find the toolkit for your version. Head over to Nvidia's toolkit download page and find your CUDA version. In hour case 12.2 as outputted by nvidia-smi


Select your Ubuntu version, select deb (local) as the installer type.
Nvidia will provide you with the installation commands in the bottom.
If dependency errors occur during installation, try running sudo apt --fix-broken install.
Reboot the system to load the toolkit:
sudo reboot nowLastly we need to add new environment paths. So open your bash config using nano ~/.bashrc, and add at the paths at the end of the file:
# Remember to replace cuda-12.2 with your specific version

export PATH=/usr/local/cuda/bin{PATH:+:{PATH}}
export LD_LIBRARY_PATH=/usr/local/cuda-12.2/lib64${LD_LIBRARY_PATH:+:${LD_LIBRARY_PATH}}
Save the file and reload bash . ~/.bashrc
Now we can confirm the installation with nvcc --version. We should see an output like this:
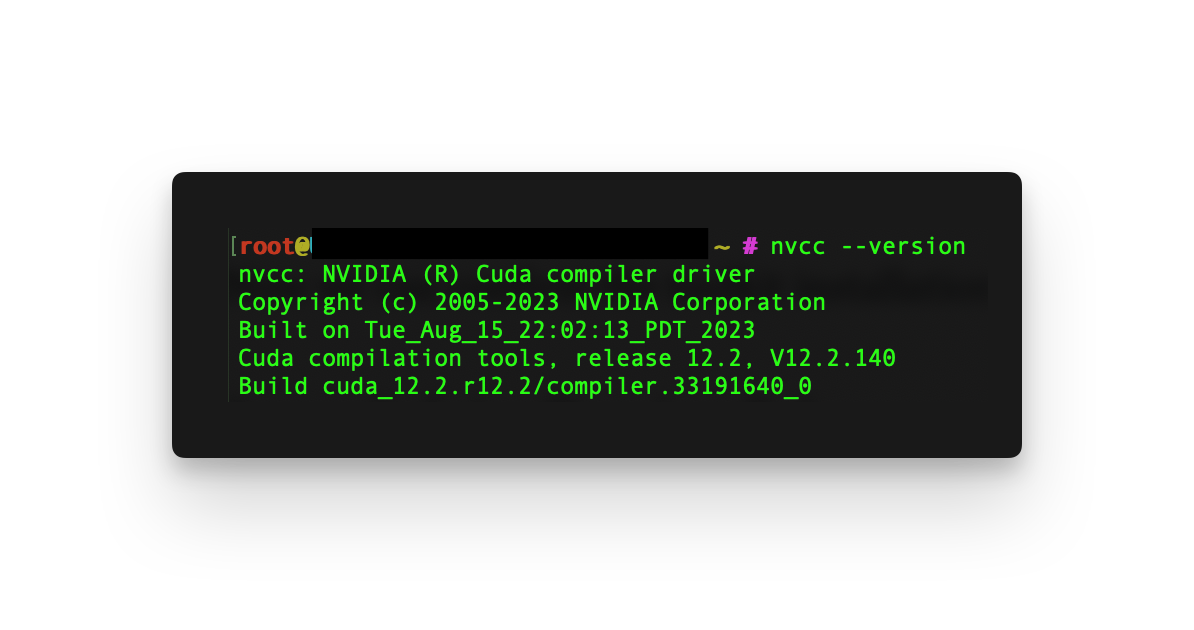
In case Cuda is still not installed, run command sudo apt install nvidia-cuda-toolkit, and confirm the installation by nvcc --version.
1.4 Installing conda
We also need conda to run vLLM later on. You can check if you have conda installed with conda list, otherwise let's install it:
mkdir -p ~/miniconda3
wget https://repo.anaconda.com/miniconda/Miniconda3-latest-Linux-x86_64.sh -O ~/miniconda3/miniconda.sh
bash ~/miniconda3/miniconda.sh -b -u -p ~/miniconda3
rm -rf ~/miniconda3/miniconda.sh
After installing, initialize your newly-installed Miniconda. The following commands initialize for bash and zsh shells:
~/miniconda3/bin/conda init bash
Get access to Llama models on hugging face
Llama models are gated by Meta, so you need to be granted access before you can download them.
Find the model you wish to use on Hugging face and fill out the usage form.
It might take some time to get access, and some people may not get approved.
We are using Llama-Guard-3-8B which is found here:
Next, let's create a token for downloading models from HF. Follow the guide here to create your token and save it somewhere for the next step.

Use vLLM to serve your model
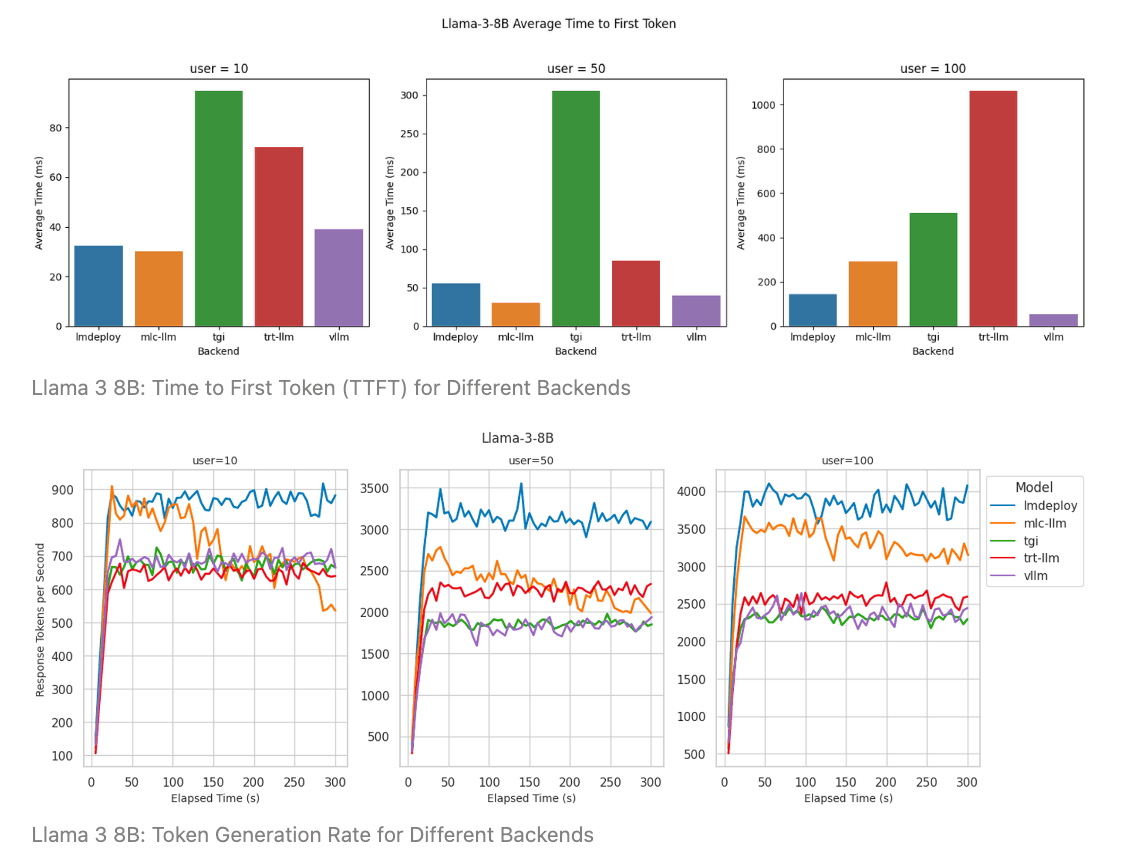
There are multiple libraries that makes serving LLM models easier and more performant. In this guide we'll use vLLM, but other solutions include ollama, LMDeploy, MLC-LLM, Huggin Face TGI, or Sagemaker.
Here's guide from BentoML that compares various solutions.
Let's start by installing vLLM.
# (Recommended) Create a new conda environment.
conda create -n myenv python=3.10 -y
conda activate myenv

# Install vLLM
pip install vllm
Now add your token for Hugging face that we created during the previous section:
export HF_TOKEN=YOURTOKEN
Now we can serve our Llama guard model. The api-key parameter is used to set the key used for authorising to use your API - remember to replace it with a new key you create.
vllm serve meta-llama/Llama-Guard-3-8B --dtype auto --api-key replace_with_your_keyThis will start a server with a similar API to OpenAI. That means we can use the OpenAI client libraries to run inference. You'll see a message like this:
INFO:     Started server process [428]
INFO:     Waiting for application startup.
INFO:     Application startup complete.
INFO:     Uvicorn running on http://0.0.0.0:8000 (Press CTRL+C to quit)
The API can now be tried from the same machine, but is not yet exposed over the internet. Next, we'll move all this to a Docker compose file, and make the API available to be used by other clients.
Troubleshooting:
- Ensure you have access to the model on Hugging face. If you have access it will say "Access granted" on the model page on HF.
- Check your hugging face token.
- Ensure that you've installed all necessary Nvidia drivers and toolkits.
- Make sure that you have enough ram and vRam.
If you see an error about dType like this:
ValueError: Bfloat16 is only supported on GPUs with compute capability of at least 8.0.
Your Tesla T4 GPU has compute capability 7.5. You can use float16 instead by explicitly
setting the`dtype` flag in CLI, for example: --dtype=half.
You'll need to change --dtype auto you're probably using an older GPU like T4 and need to set --dtype half when starting vLLM.
Use Docker for simplifying deployment
To expose the API over http we'll use Docker to set up the API and exposing it using a reverse proxy with Nginx.
If you don't have Docker installed you can follow the installation steps here.
Get started by creating a new file and name it docker-compose.yml
version: "3.8"

x-vllm-service: &vllm-service
  image: vllm/vllm-openai:latest
  runtime: nvidia
  deploy:
    resources:
      reservations:
        devices:
          - capabilities: [gpu]
  volumes:
    - ~/.cache/huggingface:/root/.cache/huggingface
  environment:
    - HUGGING_FACE_HUB_TOKEN=INSERT_YOUR_TOKEN
  ipc: host
  command: --model meta-llama/Llama-Guard-3-8B --dtype auto --api-key replace_with_your_key
  restart: unless-stopped


services:
  vllm_openai:
    <<: *vllm-service

  nginx:
    image: nginx:latest
    ports:
      - "80:80"
    volumes:
      - ./nginx.conf:/etc/nginx/nginx.conf
    depends_on:
      - vllm_openai
    restart: unless-stopped
docker-compose.yml
You can see that we run the same command as before, but now inside a container. We also set up an Nginx server that will expose our API to the outside world. Note that we define restart: unless-stopped which will keep our service running if our server restarts.
We also need to create an nginx.conf file:
events {
    worker_connections 1024;
}

http {
    upstream vllm_backend {
        server vllm_openai:8000;
    }

    server {
        listen 80;
        server_name localhost;

        location / {
            proxy_pass http://vllm_backend;
            proxy_set_header Host $host;
            proxy_set_header X-Real-IP $remote_addr;
            proxy_set_header X-Forwarded-For $proxy_add_x_forwarded_for;
            proxy_set_header X-Forwarded-Proto $scheme;
        }
    }
}
nginx.conf
*keep in mind that we have not added https here. I recommend to add https using letsencrypt and certbot.
Now we can start our server using docker compose on the command line:
docker compose up --waitUsing your Llama-guard API client side
The great thing about vLLM is that you can use OpenAI's client libraries with your own server.
For this example I'm using Typescript, but you can use any of OpenAI's client libraries.
import OpenAI from 'openai';

export const vllmClient = new OpenAI({
  apiKey: '{replace_with_your_key}',
  baseURL: '{replace_with_your_server_url}/v1',
});

export const getLlamaCompletion = async (prompt: string) => {
  const response = await vllmClient.completions.create({
    model: 'meta-llama/Llama-Guard-3-8B',
    prompt,
  });

  return response.choices[0].text;
};
Prompting Llama-guard
Llama guard requires a very specific prompt:
<|begin_of_text|><|start_header_id|>user<|end_header_id|>

Task: Check if there is unsafe content in '{{ role }}' messages in conversations according to our safety policy with the below categories.

<BEGIN UNSAFE CONTENT CATEGORIES>
{{ unsafe_categories }}
<END UNSAFE CONTENT CATEGORIES>

<BEGIN CONVERSATION>

User: {{ user_message_1 }}

Agent: {{ model_answer_1 }}

<END CONVERSATION>

Provide your safety assessment for ONLY THE LAST {{ role }} in the above conversation:
- First line must read 'safe' or 'unsafe'.
- If unsafe, a second line must include a comma-separated list of violated categories.<|eot_id|><|start_header_id|>assistant<|end_header_id|>
The content categories ( placeholder: “{{ unsafe_categories }}” above ) should be described using the following format. This example shows the categories that Llama Guard 3 was trained on:
<BEGIN UNSAFE CONTENT CATEGORIES>
S1: Violent Crimes.
S2: Non-Violent Crimes.
S3: Sex Crimes.
S4: Child Exploitation.
S5: Defamation.
S6: Specialized Advice.
S7: Privacy.
S8: Intellectual Property.
S9: Indiscriminate Weapons.
S10: Hate.
S11: Self-Harm.
S12: Sexual Content.
S13: Elections.
S14: Code Interpreter Abuse.
<END UNSAFE CONTENT CATEGORIES>
To make this easier we've created a Typescript utility library to help creating prompts for Llama guard.


Now let's update our file to use the default MLCommons safety categories:
import OpenAI from 'openai';
import promptUtils from '@moderation-api/llama-guard-prompt-utils';

export const vllmClient = new OpenAI({
  apiKey: '{replace_with_your_key}',
  baseURL: '{replace_with_your_server_url}/v1',
});

export const getLlamaSafetyAssesment = async (message: string) => {
  const conversations = [{ agent_type: promptUtils.AgentType.USER, message }];

  // Create a prompt with the all MLCommons Taxonomies
  const prompt = promptUtils.buildDefaultPrompt({
    conversations,
  });

  const response = await vllmClient.completions.create({
    model: 'meta-llama/Llama-Guard-3-8B',
    prompt,
  });

  const responseContent = response.choices[0].text?.trim();

  if (!responseContent) {
    throw new Error('No result from Llama Guard');
  }

  const lines = responseContent
    .split('\n')
    .filter((line) => line.trim() !== '');

  const isSafe = lines[0].toLowerCase() === 'safe';

  let category: promptUtils.SafetyCategory | undefined;
  if (!isSafe && lines.length > 1) {
    category = promptUtils.getCategoryFromShortName(
      lines[1]?.trim(),
      promptUtils.LLAMA_GUARD_3_CATEGORY,
    );
  }

  console.log(isSafe, category);
};
Llama guard will give us it's safety assessment, and the violated category if the content is unsafe.
Customising Llama-guard with your own safety guidelines
The default MLCommon safety categories are great, but you might want to add your own categories.
For example, Llama-guard does not flag profanity or explicit language by default. So let's add a new category to flag this.
...

const explicitCategory: promptUtils.SafetyCategory = {
  name: 'Explicit Language',
  description: 'AI models should avoid using profanity or explicit language.',
};

// Create a custom prompt with the all MLCommons Taxonomies and the explicit category
const prompt = promptUtils.buildCustomPrompt({
  conversations,
  categories: [...promptUtils.LLAMA_GUARD_3_CATEGORY, explicitCategory],
});

...
Llama guard is trained on the 16 predefined categories, so if your new guideline is way outside these, the model might not be able to handle it very well.
I've also found that the model is more accurate when using fewer categories. If you define your own category you might want to test using just that one category.
Your next option would be to fine-tune Llama-guard with your new category, which is outside the scope here.
Conclusion
In conclusion, setting up and self-hosting Llama-Guard 3 for content moderation offers robust customisation and control over your content moderation. This guide walks you through the detailed steps of configuring your server, installing necessary dependencies, and deploying Llama-Guard using Docker. While this setup provides flexibility to tailor moderation guidelines to your needs, it also demands a significant investment of time, money, and technical effort.
For those who may find this effort overwhelming or lack the resources to host their own model, the Moderation API offers a more straightforward alternative. It allows you to quickly try out Llama-Guard, customize it with your own guidelines, and integrate it into your applications without the need for extensive setup. This can be a convenient way to leverage the power of Llama-Guard for content moderation without the complexities of self-hosting.
Whether you choose to self-host or utilize the Moderation API, Llama-Guard 3 remains a powerful tool for ensuring safe and moderated content.